Saturday, December 17, 2011

Ice Cream Cone Cannoli


Thank God for Pinterest, I find all sorts of fun things and neat recipes to make. My latest that I just finished today: Ice Cream Cone Cannoli's! I call it the American Cannoli (Too lazy to make the real shell =P)

Thank God for Pinterest, I find all sorts of fun crafts and food recipes on there! I don't want to just Pin things and never do them! So I'm going to slowly do one at a time. I found these Ice Cream Cone Cannoli's, I call them American Cannoli's -- because we're too lazy to fry up the real things ;)

What you need:
  • 24 oz whole milk ricotta
  • 3/4 cup sifted powdered sugar
  • 1 cup mini chocolate chips
  • 1 teaspoon vanilla
  • 12 count sugar cones (CONE's not cups or bowls)

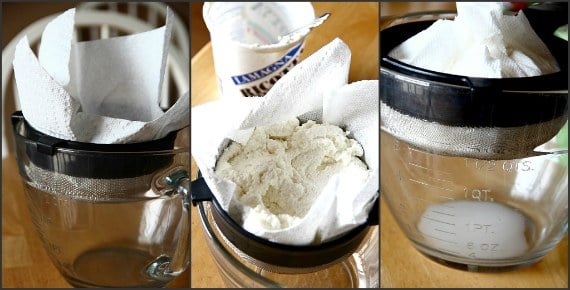
  1. Place your ricotta in a strainer lined with a cheese cloth or paper towel. Let it sit for a few hours, or overnight, squeezing to help release the liquid.
  2. When the ricotta is strained, stir in your sifted powdered sugar and chocolate chips until combined thoroughly.
  3. Place in a piping bag or zip-lock until ready to use.
  4. Melt some chocolate chips for the cones and dip the cones in it, using a spoon to spread it evenly around the cone.
  5. Dip the cone with melted chocolate into chocolate chips. (I placed them on a pizza sheet and then into the freezer after this so they'd harden and stay in place.)
  6. When you're ready, just fill your cones with your filling and wallah!

makes enough cream for 12-14 cannoli

* Optional ~ you can add a few tablespoons of granulated sugar (I did to mine so it'd be a bit sweeter and I also added another 3/4 cup of powered sugar to thicken the ricotta!)
^ My Cannoli's :-)

The other photos are from Cookiesandcups.com

Monday, December 12, 2011

Two Posts In One Day!


I've been busy working just about 9 days in a row - phew. I finally had a breather today! So as an update, I bought a car last week! Wahoo! A Hyundai Santa Fe, SE! It's used, a 2008, but I love it! It's bigger than the Honda CR-V I initially wanted. However, it's MUCH more quiet on the road, I'd say like 80% more quiet... that's how noisy the CR-V was!... it has a V6 so it has a lot more power, has more room for storage, AC vents in the back row for the kiddos, 300 XM Radio channels, radio controls on the steering wheel and a cool blue lighted interior at night..and I just like the look of it over-all, better than the CR-V. I decided I didn't want the Hyundai Elantra because I needed an SUV for my job, and for the future of course! I'm okay with sacrificing 10 MPG over space and more comfort. I wanted a white one, but I ended up liking this one better, with the the darker interior. The exterior color I was not 100% in love with, but it's growing on me!! It's called "Sage" but during the day it's a blueish green, and at night it's a blueish gray, haha. Oh well, here's to my first car payment years, and owning my first "real" vehicle.

DIY Glass Accents


Thanks to Pinterest, I found this cool & fool proof, project! I like to be creative and crafty, but sometimes my crafts don't turn out so well and I give up...but this was super easy and fun to do! Oh, and it's CHEAP! Such great Christmas presents if you're in a scramble, and created from your own imagination and heart! So perfect! :) And they're practical and cute!
First, you need to get your choice of glass wear..I got these different shaped glasses at the dollar store!
Buy assorted rubber bands - also at the dollar store.
Then, you take your glasswear and you make whatever pattern you want from your rubber bands. You can do so many creative looks...and even add in lace or sticker letters for writing, whatever you can think of!! These were my first run so I just stuck to simply rubber bands.
You need this spray paint - Glass Frosting - it's the most expensive part, but $6.99 at Hobby Lobby, not too bad. Plus a 20% off coupon...so it's like $5.00.
Then you spray paint your glasswear...up and down, up and down.
Then you let them all dry...Oh and I found those tall ones at the .99 cent store...I thought the pink glass would be awesome to do!

And the top photos of the post are the finished projects. I put flowers in the tall vases and then tea light candles in the round glasses! :) The photo quality is bad, they look much cuter in real life! :)

Happy Do-It-Your-Self-Ing!!